|
How To support Expandable Screens in PalmOS applications
|   |
Problem: How To support Expandable Screens in PalmOS applications
Solution: Starting with Satellite Forms 7.0, your PalmOS applications can now support the expandable screens and dynamic input area available on some Palm Powered devices.
Background Information
Some newer PalmOS devices include support for using the area of the screen that was formerly dedicated to the silk-screened Graffiti input area, and for rotating the display between tall (portrait) and wide (landscape) display orientations. This area of the screen can display the standard Graffiti input area, or other input options such as an onscreen keyboard, or it can be utilized by applications to display larger forms. This area of the screen is known as the Dynamic Input Area (DIA), and is sometimes called the "soft" or "virtual" Graffiti area.
Some Palm Powered devices that have dynamic input areas include the Palm Tungsten T3, T5, TX, and LifeDrive, the Garmin iQue 3600, the Tapwave Zodiac 1 and 2, and some Sony handhelds.
The screenshot below shows two different input configurations available on some PalmOS devices with a Dynamic Input Area (DIA). The first shows the virtual Graffiti mode, which resembles and acts like the standard input area on devices that do not have a DIA. The second shows a keyboard input mode that is quite handy (these screenshots are from a Palm TX):
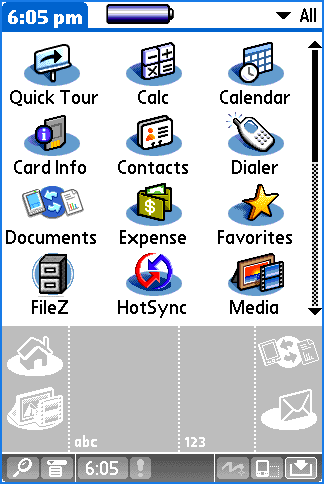
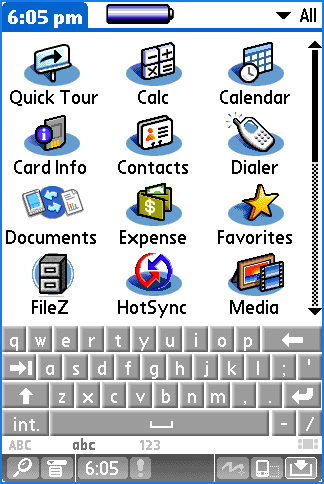
Note the input trigger icon on the status bar, at the far right. The input trigger enables the user to decide whether to display the DIA, or to minimize it for more screen space. The status bar icon to the left of the input trigger in these screenshots allows the user to switch the screen orientation between portrait mode and landscape mode. The Palm LifeDrive has a hardware button on the side of the device to perform this function, instead of an icon on the status bar.
The next screen demonstrates the extra screen space that is available to applications when the DIA is minimized. The form expands in height to become taller (portrait orientation) and a small status bar is displayed along the bottom of the screen.
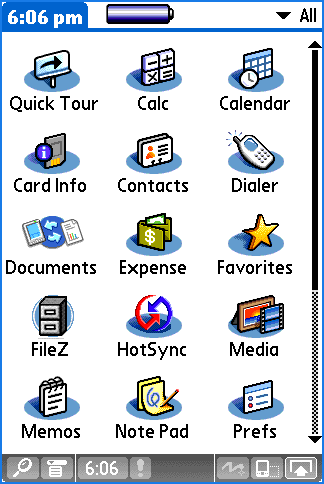
When the DIA is minimized, 40% more screen area becomes available to the application, as the effective screen height (or width, if in landscape mode) inreases from 160 pixels to 224. How you decide to use that additional screen space is up to you -- do what makes the most sense for each individual form in your application.
Satellite Forms DIA Control Overview
By default, Satellite Forms applications will still use the square 160x160 screen area on DIA-capable devices, and the input trigger is disabled (greyed out). With the input trigger disabled, the user cannot minimize the DIA, but they can still select which DIA input configuration they want to use (eg. keyboard or virtual Graffiti, etc.). This is the way that older Satellite Forms (and other) applications that did not specifically add DIA support behaved on DIA-capable devices.
In order to support the Dynamic Input Area in SatForms PalmOS applications, a new DynamicInputArea custom control extension has been created. When this DIA control is added to your application, you gain these capabilities:
When you receive the event informing you that the DIA state or orientation has changed, you can respond by moving or expanding controls on the form. How can you move or change the size of controls? Satellite Forms 7.0 now includes the ability to get and set the position and size of form controls at runtime through the new <control>.GetPosition and <control>.SetPosition properties, as explained in the KnowledgeBase article "How To Move and Resize Controls at Runtime".
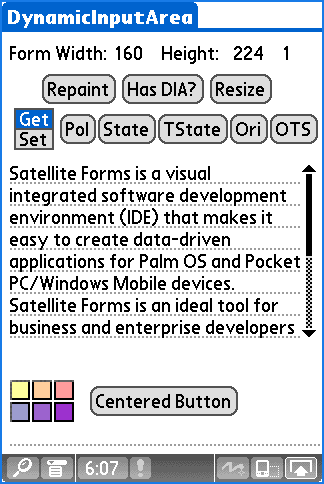
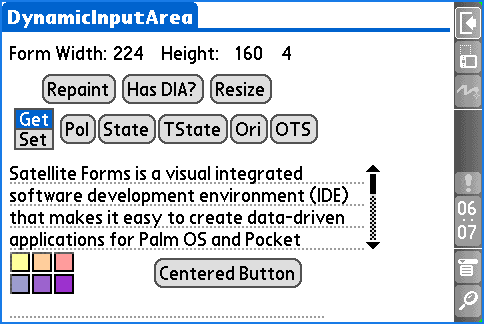
The DIA control and SetPosition/GetPosition control properties are demonstrated in the sample project "DynamicInputArea" included with Satellite Forms 7.0. Screenshots from that sample application are displayed below.
The first screenshot below shows a typical SatForms application displaying some buttons, a paragraph control, color bitmap, and edit control, with the DIA displayed (maximized). The second screenshot shows the same form after responding to the event when the user minimized the DIA by tapping on the input trigger. The form adapted to the increased screen size by moving some controls down lower on the form, and expanding the paragraph control to display more text.
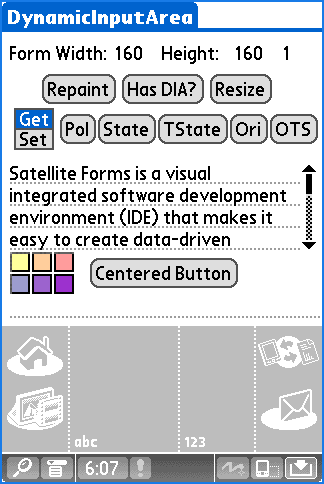
The next screenshot illustrates how the application responded to a change from portrait orientation to landscape orientation, by increasing the width of the paragraph control and shifting the centered button over to stay centered on the now wider screen.
Implementing DIA Support (Technical Details)
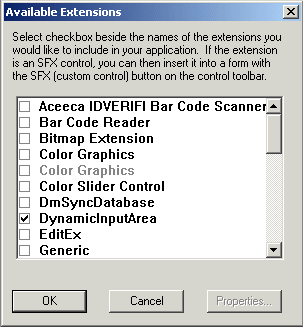
1. In order to support the DIA in your application, you must first include the DynamicInputArea control in your project. Click on the Manage Extensions toolbar icon, and select DynamicInputArea from the list of available extensions:
2. With the DIA control added to your application, several script functions to get and set the various DIA options and states become available:
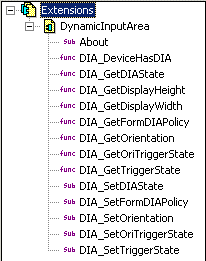
Some of these functions are intuitively named, while others might seem somewhat mysterious, so we'll try to explain them here.
The current settings of the DIA (maximized or minimized) is known as the DIA State. PalmSource has defined these possible DIA states:
|
DIA State Value |
Description |
|
0 |
The dynamic input area is being displayed. The form is the standard 160x160 square dimensions. |
|
1 |
The dynamic input area is not being displayed. The form is either tall or wide, but is not square. |
|
2 |
The input area is not dynamic, or there is no input area on this device. |
|
5 |
Pass this value to activate the last user-selected input area state. |
The current status of the input trigger is known as the Input Trigger State, with these possible values:
|
Input Trigger State |
Description |
|
0 |
The input trigger is enabled, meaning that the user is allowed to open and close the dynamic input area. |
|
1 |
The input trigger is disabled, meaning that the user is not allowed to close the dynamic input area. |
|
2 |
There is no dynamic input area on this device. |
The current status of the orientation trigger is known as the Orientation Trigger State, with these possible values:
|
Orientation Trigger State |
Description |
|
0 |
The orientation trigger is disabled, meaning that the user is not allowed to change the display orientation. |
|
1 |
The orientation trigger is enabled, meaning that the user is allowed to change the display orientation. |
The current screen orientation can have one of these possible values:
|
Orientation State |
Description |
|
0 |
Set this value to tell the system to activate the last user-selected orientation. |
|
1 |
The display is in portrait (tall) orientation. |
|
2 |
The display is in landscape (wide) orientation. |
|
3 |
The display is in reverse portrait orientation (upside-down from the normal portrait orientation). |
|
4 |
The display is in reverse landscape orientation (upsidedown from the normal landscape orientation). |
Finally, a dynamic input area Policy specifies how the dynamic input area should be handled while a form is active. These values are possible:
|
Form DIA Policy |
Description |
|
0 |
Forces the dynamic input area to stay displayed while the form is active. The input trigger is disabled. |
|
1 |
The user and the application control whether the input area is active. |
Now that you understand the DIA jargon and have memorized all the possible values, we'll explain how to put that knowledge to work in your application.
3. The DIA control is a custom control extension which must be added to your forms like other custom controls such as the Symbol Integrated Scanner control. It is not visible on the device screen, but is visible on the form design window in App Designer as a control that resembles the input trigger on the status bar.
The control supports 5 control configuration settings:
DIAPOLICY = n
where n is one of the form DIA Policy values listed in the table above. In order to allow the user to control the DIA state via the input trigger on the status bar, set the DIAPOLICY=1. To effectively disable DIA support and act just like older applications, set the DIAPOLICY=0. The default value for this config option if omitted is 1. Get/Set values at runtime via script functions DIA_GetFormDIAPolicy/DIA_SetFormDIAPolicy.
DIASTATE = n
where n is one of the allowable DIA State values listed above. Setting this value to DIASTATE=5 is a good option, because that sets the form to the last user-selected DIA state. It stands to reason that if the user prefers to have the DIA closed (minimized), then they would probably prefer to keep it that way while running your application too. The default value for this config option if omitted is 5. Get/Set values at runtime via script functions DIA_GetDIAState/DIA_SetDIAState.
DIATRIGGERSTATE = n
where n is one of the allowable Input Trigger State values listed above. Set this value to DIATRIGGERSTATE=0 in order to enable the user to change the DIA state via the input trigger, or to DIATRIGGERSTATE=1 to prevent the user from changing the DIA state via the input trigger on the status bar. The default value for this config option if omitted is 1. Get/Set values at runtime via script functions DIA_GetTriggerState/DIA_SetTriggerState.
ORIENTATION = n
where n is one of the Orientation State values listed above. The default value for this config option if omitted is 0. Get/Set values at runtime via script functions DIA_GetOrientation/DIA_SetOrientation.
ORIENTATIONTRIGGERSTATE = n
where n can be 0 to disable the orientation trigger or 1 to enable the orientation trigger. The default value if omitted is 1. Get/Set values at runtime via script functions DIA_GetOriTriggerState/DIA_SetOriTriggerState.
In addition, script methods are provided to determine if the device has DIA capability, and to get the current screen width and height.
4. The DIAcontrol's OnClick event is fired whenever the display size or orientation is changed (let's call this the resize event). Use this event to handle the moving & resizing of your form controls in reaction to the display change. The sample application handles this by keeping track of the form height, width, and orientation, and comparing those values to the current values when the resize event is fired. The form's current height is obtained via the DIA_GetDisplayHeight function; the current form width is obtained with the DIA_GetDisplayWidth function. The current orientation is determined with a call to DIA_GetOrientation. If the screen has in fact been resized, then the resize script moves some controls to new locations and changes the size of some controls, as needed.
Here's an example of the script code to change the height of the paragraph control to make it taller or shorter depending on the display height:
'calc paragraph size
dim pgHeight
if frmHeight > 160 then
pgHeight = 88
else
pgHeight = 44
endif
'expand paragraph height
pgText.SetPosition(4, 80, 152 + (frmWidth - 160)/2, pgHeight )
Here is an example of script code to center a button control based on the form width, and to anchor it a specified number of pixels above the bottom of the form:
'center the button horizontally and place it 32 pixels above the bottom
btnCenter.SetPosition(44 + (frmWidth - 160)/2, frmHeight - 32, 74, 15)
Review all of the scripts in the DynamicInputArea sample project, and test it on a device or simulator with DIA capability, to get a good feel for the possible advantages in supporting the DIA in your application.
Conclusion
If your PalmOS application can benefit from the additional screen area available on devices with the Dynamic Input Area, it is now possible to take advantage of this capability in Satellite Forms 7 using the DynamicInputArea control and the new .SetPosition and .GetPosition control properties. Your users will appreciate the ability to use the extra screen space allowed by the expandable screen.
Keywords: DIA, dynamic, input area, virtual Graffiti, soft Graffiti, expandable, PalmOS, T3, T5, TX, LifeDrive
KB ID: 10036
Updated: 2010-06-22
Satellite Forms KnowledgeBase Online